
Your Fieldworkers have the ability to view the details of any job assigned to them and go through the lifecycle of the job from the Fieldworker App on your iPhone or Android Device. To learn more about how to download and navigate the app click here.
Accepting Jobs
When you sent your Fieldworker a job they will get a push notification from the app showing that a job has been dispatched to them. They may also get a text and/or email.
Once you have logged into the app they will see a numbered badge in it in the upper right of the New Jobs icon.
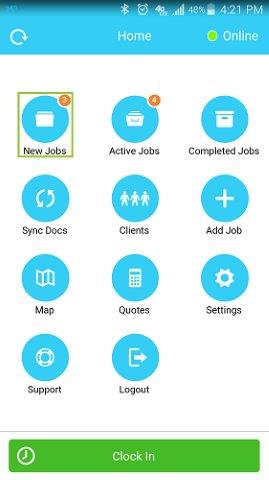
Tap on New Job to see the list of all jobs that have been dispatched to your Fieldworker.
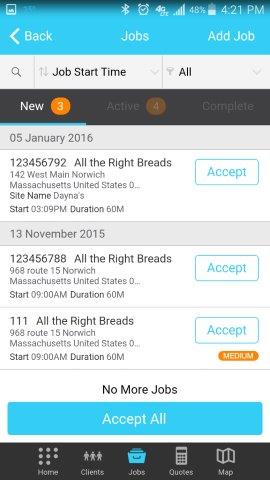
There are three different ways to accept a job.
- Tap Accept All at the bottom of the page to accept every job on the list.

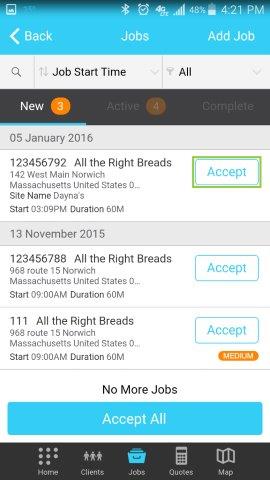
- Tap Accept next to the job information on the list to accept an individual job.
- Tap on the job to bring up the job details for you to review. On this page, your fieldworker can tap Accept at the bottom of the screen.
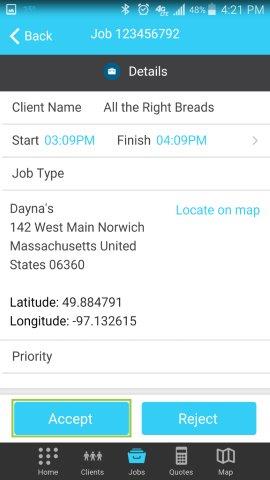
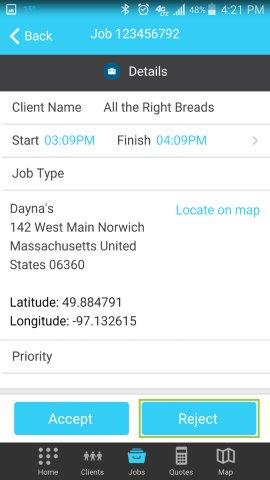
If your fieldworker would like to reject the job tap the job to bring up the job details and tap Reject at the bottom of the screen. *This option may not be available if an admin has turned it off in the Admin Portal. To learn more about App Settings please click here.
Reviewing Your Job
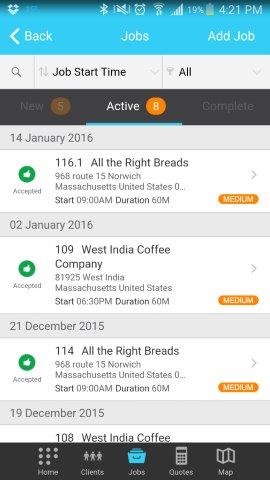
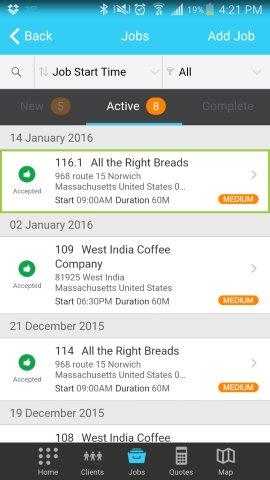
Once your fieldworker accepts a job you will be brought to the Active Job list. This list will show all the jobs that you have accepted or started and not finished. The job you just accepted can now be found here.
Your fieldworker can then tap on the job that they would like to start to bring up the Job Details.
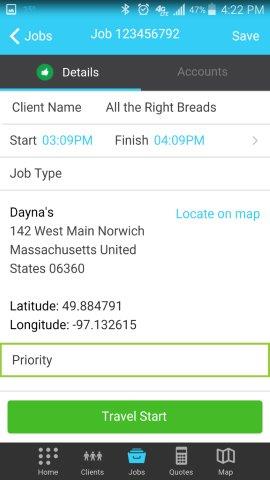
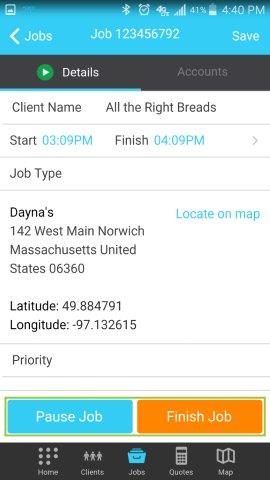
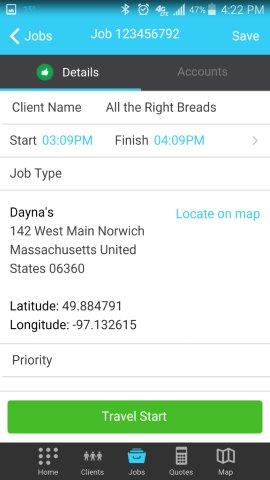
At the top of the screen, they will see the Job Number.
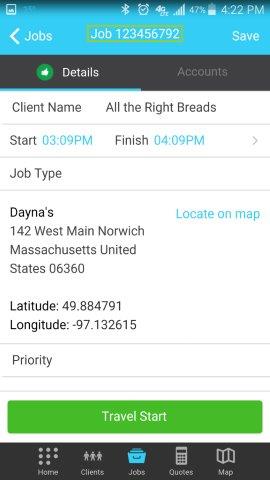
To the left of the Job Number is Jobs this will bring you back to the Active Job list.
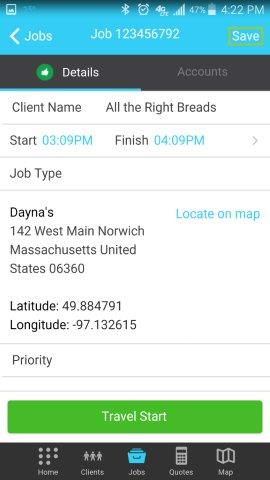
To the right of the Job Number is the Save button. This will save any job details that your fieldworker has edited which will allow them to move on to another job or leave the app without losing any of their work. Once you have saved you will be navigated back to the Active Job list.
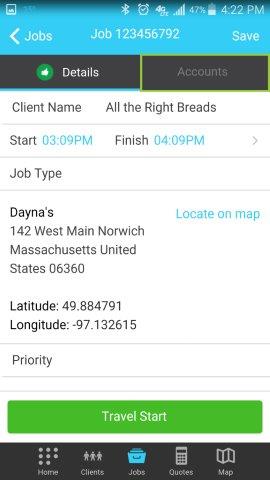
Bellow the Job Number are two tabs.
- Details are the job details. There is an Icon indicating the status of the left of Details.

- Accounts are items and invoicing information. To learn more about this tab please click here.
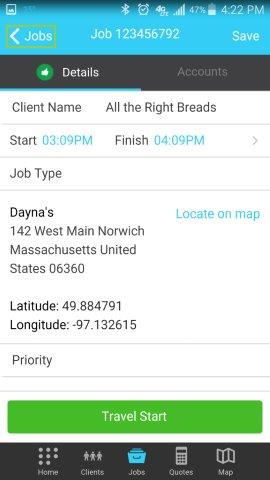
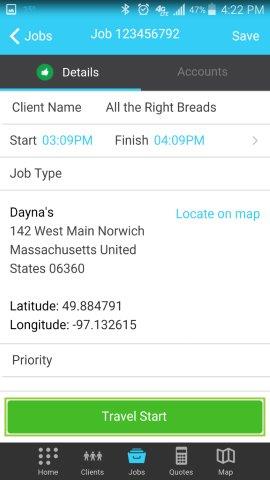
Details Tab
At the top of the Details tab is the Client Name.

Below the Client name is the scheduled Start and Finish times.
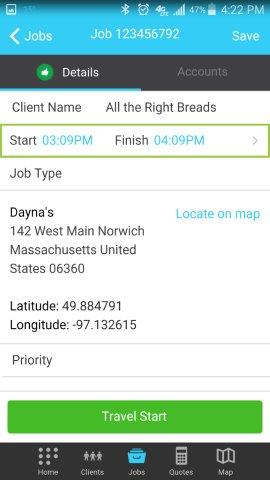
Tap on the Start and Finish time to bring up a list of the Scheduled Start and Finish Date and Time with a Duration at the bottom. If you have given your Fieldworkers permission they will be able to tap on any of the dates or times and be able to adjust them.
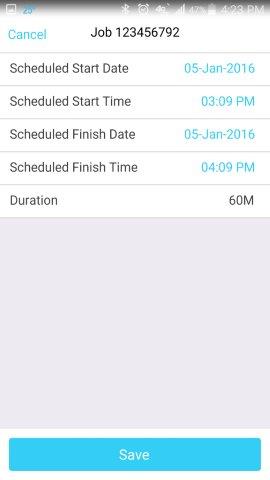
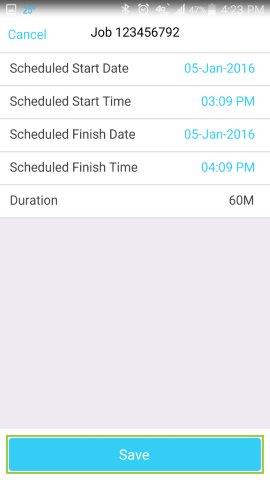
Once your fieldworker has edited the times they can tap the blue Save button at the bottom of the screen to save the new times. Once this is done they will be brought back to the Details page.
Below the Start and Finish times is the Job Type.

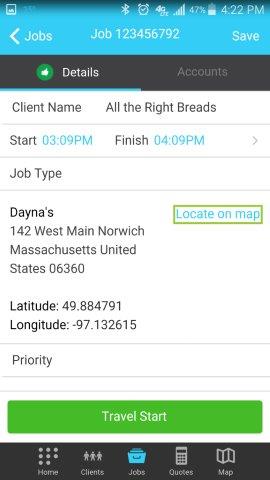
Below the Job Type is the site name and job address including Latitude and Longitude coordinates.
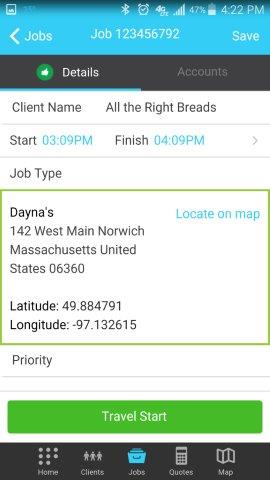
If your fieldworker taps on Locate on map the location of the job will be brought up on an external map. If you have an iPhone this will link to Google Maps. If they have an Android their phone will prompt them to pick which app they would like to open the map in. If they have an iPhone this will link to Google Maps or the Google Maps app if it is installed.
Next is the Priority.
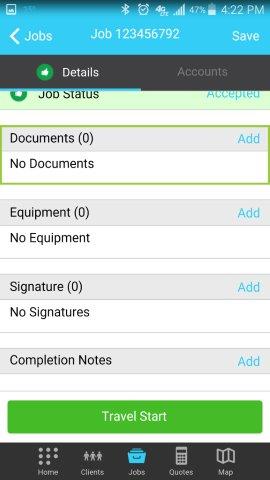
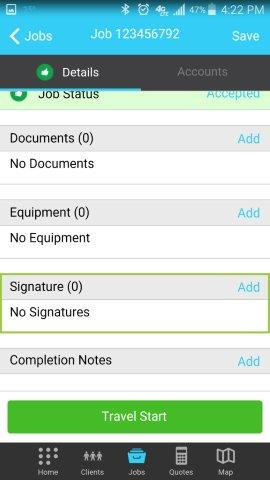
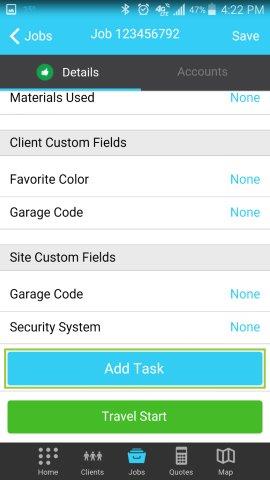
Bellow the primary Job information is seven sections that allow your fieldworker to add and edit job information.
- Client Details
- Job Details
- Documents
- Equipment
- Signature
- Completion Notes
- Custom Fields (if any)
Client Details
The Client Details includes all of the Contact Info for the job, such as Phone, Mobile Phone, and Email. If your fieldworker taps on either number or the email they will be prompted to email or call the Contact.

Also in the Client Details, your fieldworker can mail the job card to the client by tapping Mail Job Card. To learn more about how to edit and send the job card please see below.
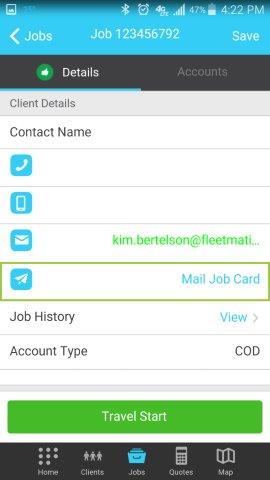
Bellow the Job Card is the Job History. Tapping on View will allow your fieldworker to see any jobs that were done for this client previously. This will include jobs that were done by other Fieldworkers. When you tap on one of these jobs you can see the job details.

The last detail in Client Details is Account Type. This is how the client’s account is set up for billing.

Editing and Sending the Job Card
If your fieldworker taps Mail Job card they will be brought to their Send Job Card screen.

If there was an email in the contact info for the client your fieldworker should now see it in the To section. If there is none, they will need to enter the email in manually.
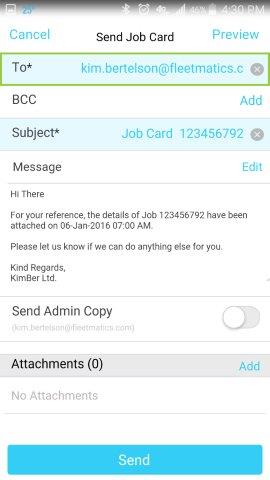
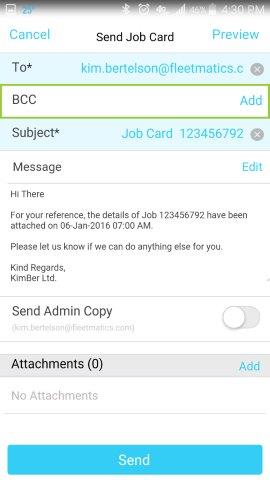
If your fieldworker would like to Blind Copy someone into the email tap Add next to BCC.
If your fieldworker would like to change the email subject they can tap the Subject line and type in a different Subject.
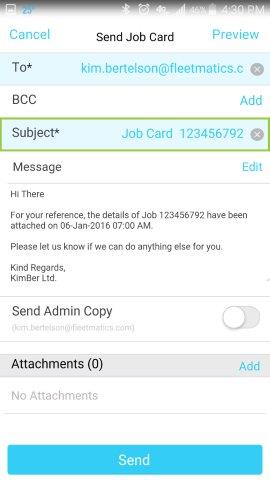
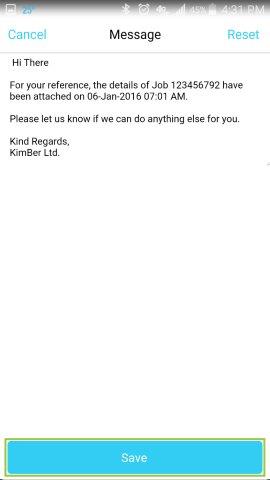
Your fieldworker can edit the body of their email before you send as well. Simply tap Edit next to the message.

This will bring your fieldworker to their Message screen where they can edit the message.
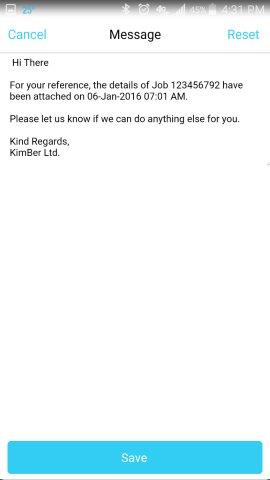
Tap the Save button at the bottom in order to save any changes your fieldworker make.
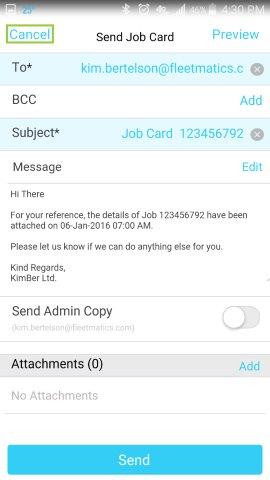
To go back to the Send Job Card page without making any changes tap Cancel in the upper left.
To send a copy to the admin tap the toggle next to Send Admin Copy.
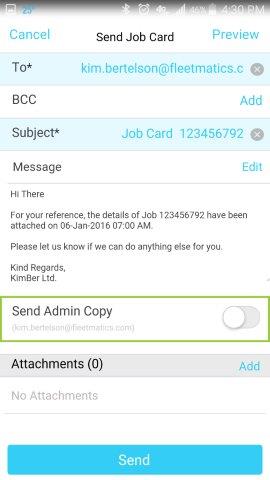
At the bottom of the page, there is a section labeled Attachments. Any documents or images that your fieldworker has attached to the job will be listed here. If they would like to add a new document or image they can do so by clicking Add.
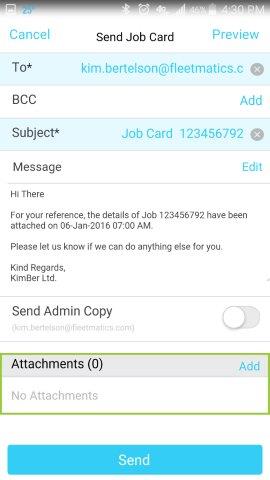
This will bring your fieldworker to the Documents screen. To learn more about how to add documents please see below

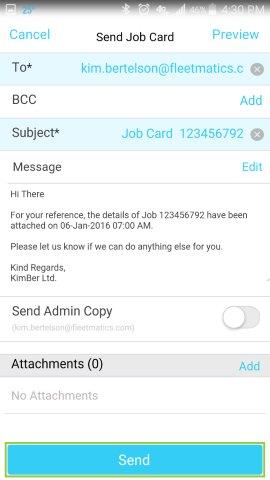
When your fieldworker is ready to send the Job card click the blue Send button at the bottom of the screen.
Job Details
The Job Details includes the Service Description, Special Instructions, Fieldworker, Job Type, Sub-job, and Job Status.
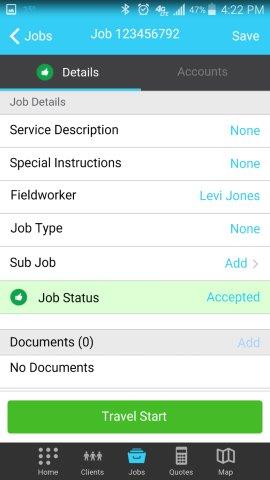
Tap Service Description in order to see the full description of the work your fieldworker is scheduled to do. They cannot edit this information in the mobile app.
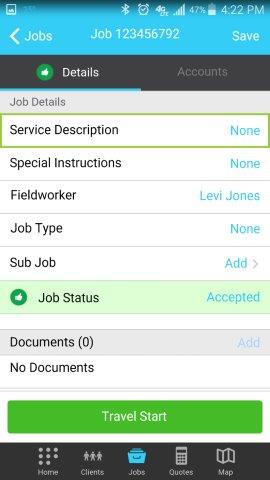
Tap Special Instructions in order to see the full description of the work your fieldworker is to do the job. They cannot edit this information in the mobile app.

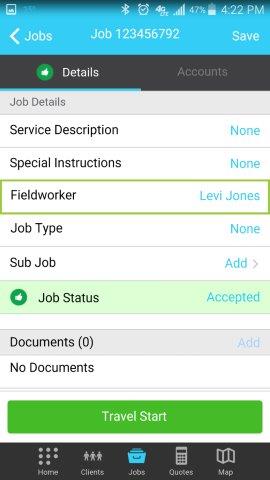
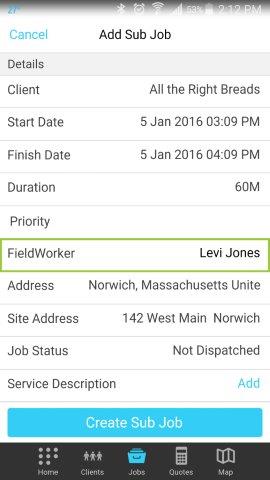
Below the Special Instructions is the Fieldworker where your fieldworker’s name is listed. If they need to change the job to a different Fieldworker they can tap on their name and select from the prompt. This will remove the job from their app and take them back to the Active Jobs list. The job will no longer appear for them to edit.
Below the Fieldworker is the Job Type. If your fieldworker needs to change the Job Type tap the current job type and select from the prompt.

If your fieldworker needs to add a Sub-job tap Add in the Sub-job field. This will bring them to a page where they can enter job information and create a Sub-job. To learn more about adding a Sub-job in the app please see below.

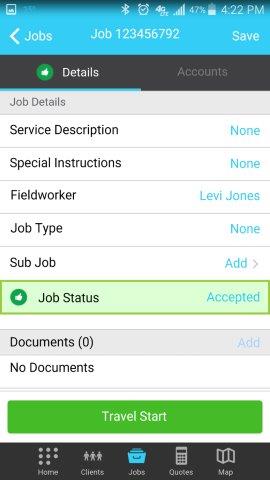
The last field in Job Details is Job Status. If your fieldworker needs to change the Job Status tap the current job status and select from the prompt.
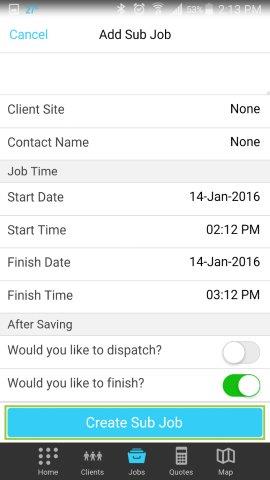
Creating a Sub-job
Tap the Add button in the Sub-job field.
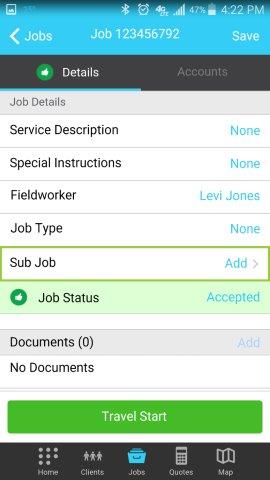
This will bring your fieldworker to the Add Sub-job screen. The Client and Job Details should be copied over from the parent job.
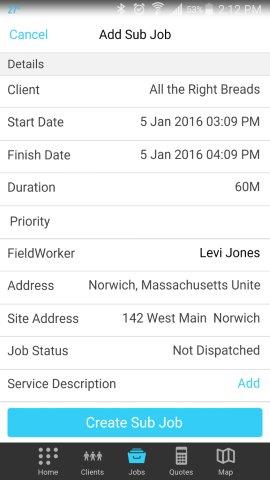
If your fieldworker needs the Sub-job to be assigned to a different Fieldworker tap Fieldworker field to select the Fieldworker.
Your fieldworker can add or edit a Service Description by tapping Add next to the Service Description field to add a pre-written description or tap in the Description field to type one in.
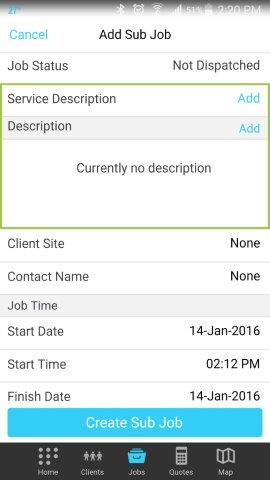
If your fieldworker needs the Sub-job to be at a specific Site tap the Client Site field to select the site from the list.

If your fieldworker needs the Sub-job to have a specific Contact tap the Contact Name field to select the contact from the list.
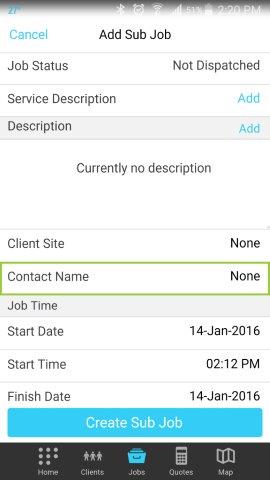
The Job Times, by default, match those of the parent job. If your fieldworker would like to change these tap the Start or Finish Date or Time to select a new Date or time.
At the bottom of the screen, there are two action buttons.
- Would you like to dispatch? will dispatch the job to the Fieldworker that has been selected. If your fieldworker does not select this option the job will show as Not Dispatched on the Admin Portal until an admin dispatches it to the Fieldworker.
- Would you like to finish? will automatically finish the job and ask your fieldworker to enter Completion Details.

Once your fieldworker has entered all the information they would like for the Sub-job they can tap the Create Sub-job button at the bottom of the screen. This will create a Sub-job in the Admin Portal. To learn more about creating and managing Sub-jobs in the admin portal click here.
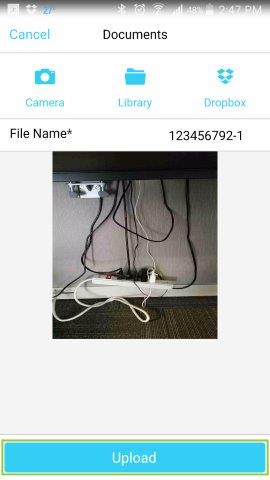
Adding a Document
To add a new Document to a job tap Add in the Documents Field.
This will bring your fieldworker to the Documents screen.
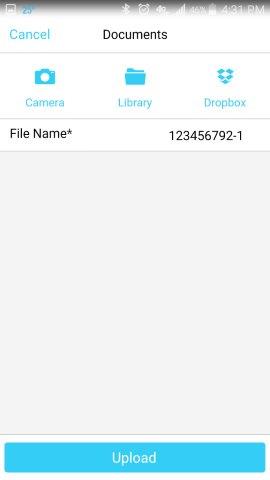
At the top of the screen, your fieldworker can select from three different sources to add Documents to the Job.
- Camera will bring them to their devices onboard camera.
- Library will bring them to their image library on their phone. If they have an Android they can select more than one image. This, however, may cause take some time as they upload from the app.
- Dropbox will bring them to the WORK folder in their Dropbox.

Once your fieldworker has selected the image they would like to attach a thumbnail will appear on the screen for them to confirm the image is correct.
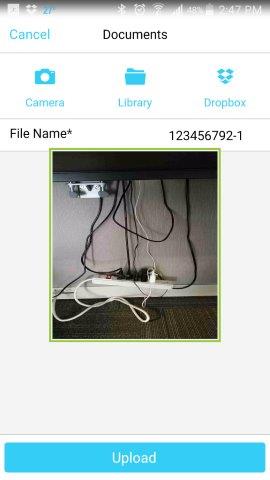
If your fieldworker would like to change the name of the document tap the File Name field and type in the name they would like to use.

Once your fieldworker is satisfied with their document(s) tap the blue Upload button at the bottom of the screen to upload the image(s) to the job.
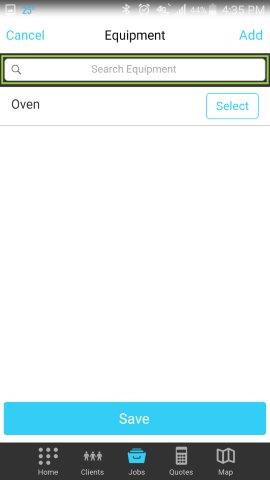
Adding Equipment
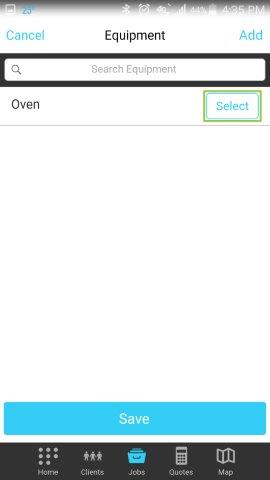
To add a new piece of Equipment to a job tap Add in the Equipment Field.

This will bring your fieldworker to the Equipment screen. On this screen, they will see a list of all Equipment associated with this site.
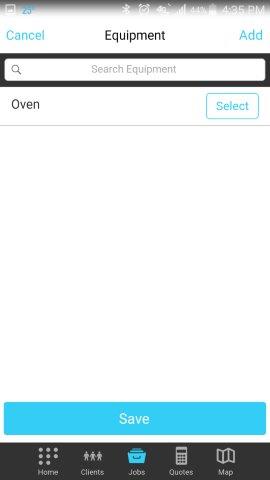
To search through the client’s list of Equipment tap on the Search bar at the top and type in the name of the piece of equipment your fieldworker would like to see.
If your fieldworker needs to add new equipment tap Add in the upper right of the screen.
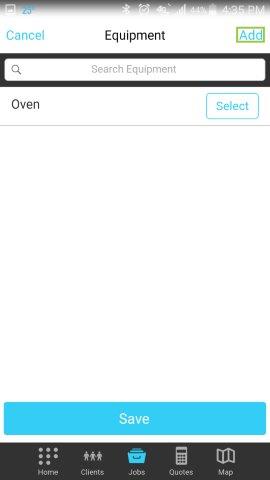
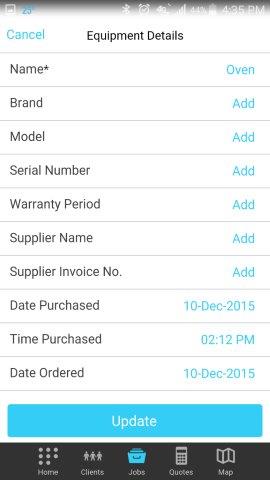
This will bring your fieldworker to their Add Equipment screen.

Tap any of the fields on this page to edit them. The only required field is the Name.
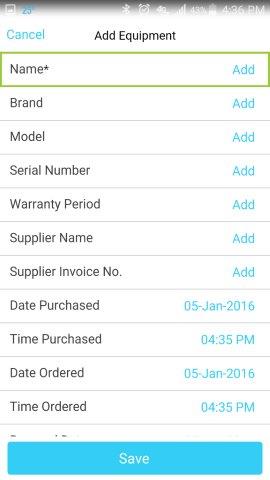
After your fieldworker has filled in all of their information they can tap the Save button at the bottom of the screen. *Keep in mind that they must select the site that is related to the job they are assigning the equipment to in order to have it available to select upon save.

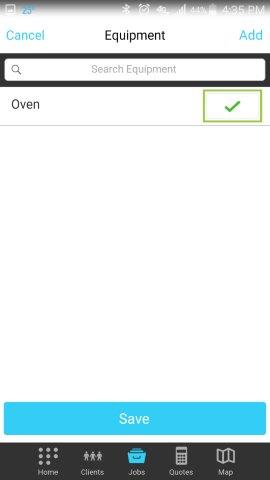
To attach Equipment to the job tap Select to the right of the equipment name.
Once your fieldworker has selected a piece of Equipment there will be a green checkmark next to it.
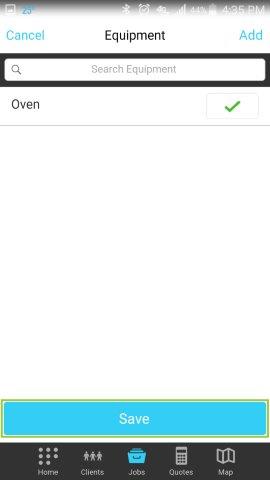
After your fieldworker has made their selections tap the Save button at the bottom of the screen.
To see equipment details for equipment that your fieldworker has added to a job tap on the name of the equipment from the Details tab.
Adding a Signature
Tap the Add button in the Signature field.
This will bring your fieldworker to the Please Sign screen.
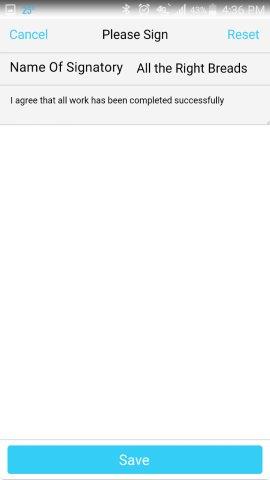
At the top of the page will be the Contact or company name under Name of Signatory. If your fieldworker would like to edit this name tap on the field and type in the new name.
Below the name is the statement that the Client is signing for. If your fieldworker would like to edit this they can tap on the statement and type in what they would like it to say. *Currently there is no way to change the default wording. Any changes to this section will not be saved for the next signature capture.
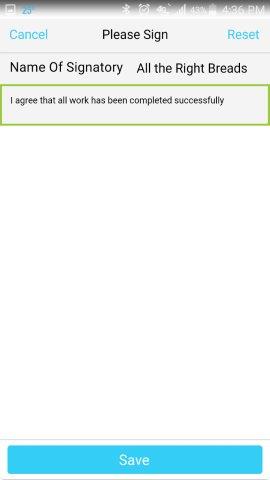
Your Client can sign with their finger in the large white space below the Statement.
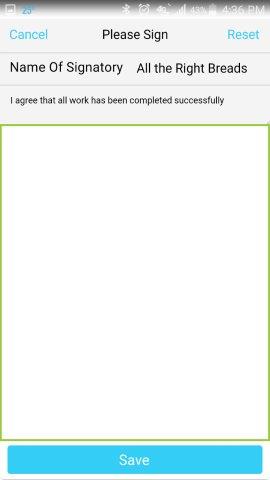
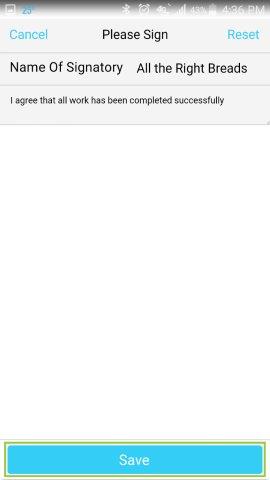
Once they have signed tap the Save button to save the signature.
To see an image of the signature tap the file name listed in the Signature field in the Details tab.

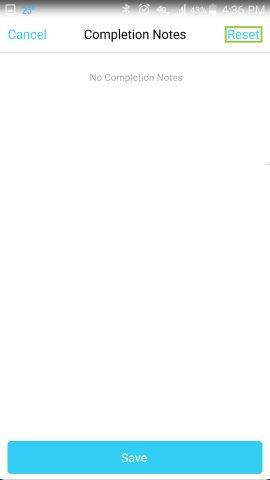
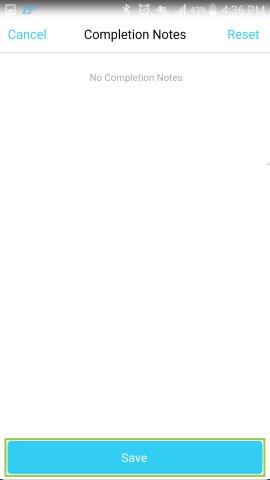
Adding Completion Notes
Any Completion Notes that are in the system will be listed under the Completion Notes section at the bottom of the screen. If your fieldworker would like to edit or add Completion Notes tap Add.
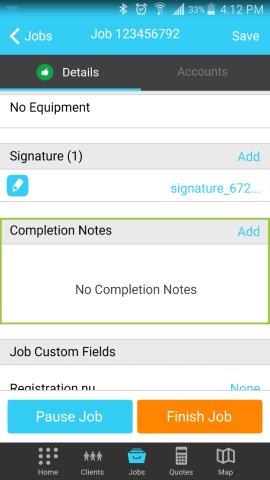
In order to add new Completion Notes tap on No Completion Notes. If there are completion notes already listed tap on the notes to bring up your fieldworker’s phone keyboard.

To go back to the Job Details page without making any changes, tap Cancel in the upper left.
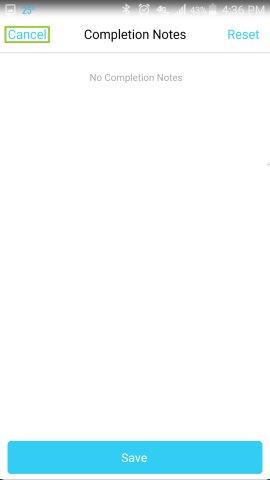
If your fieldworker needs to clear anything that they have typed into this field tap Reset in the upper right of the screen.

Your fieldworker can save their completion notes by taping the Save button at the bottom of the screen.

Custom Fields
If there are any Job, Client or Site custom fields they will be listed at the bottom of the screen. To edit any custom field tap on the field and edit the information.

Once your fieldworker has edited the information tap the Update button at the bottom of the screen.

How to Add a Task
Tap the Add Task button at the very bottom of the screen to add a Task.
This will bring your fieldworker to their Add Task screen. Tap on any of the fields to edit and add information to them.
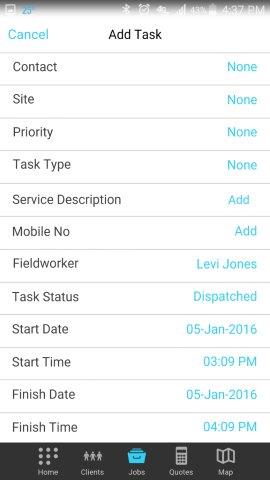
Any task will be automatically set at the same time as the job and be assigned to your fieldworker. If they would like to change this tap the Fieldworker or Time and Date fields.
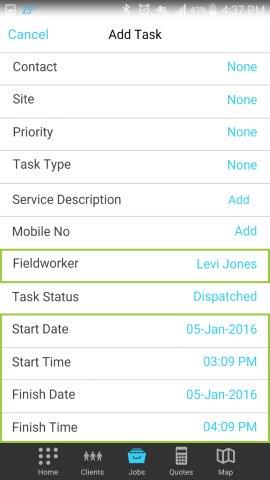
The task will also be set to “Dispatched” upon save. If your fieldworker would like to change this tap the Status Field.
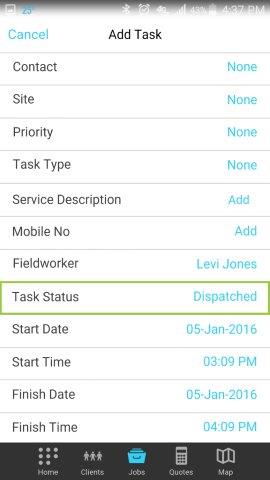
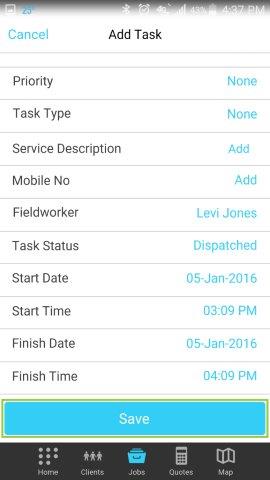
Once your fieldworker has edited the information correctly tap the Save button at the bottom of the screen.
How to Start and Finish a Job
At the bottom of the Details, screen is your fieldworker’s action or status buttons.
If your company keeps track of Travel time they will see a green bar at the bottom that says Travel Start.
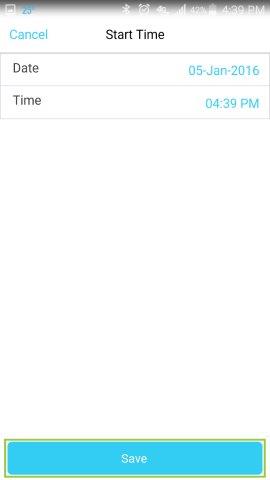
Tap this button to be brought to the Start Time screen. If your fieldworker needs to they may be able to edit the date and time on this screen.
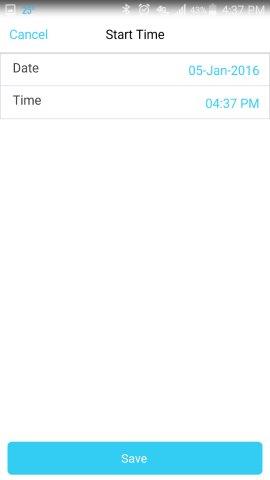
Once your fieldworker has selected the correct time tap the Save button at the bottom of the screen.

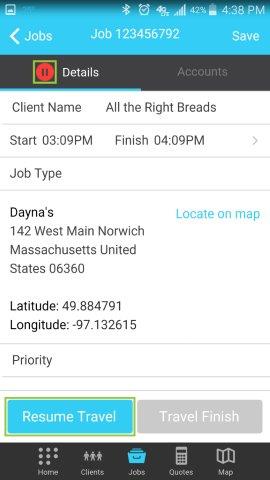
After your fieldworker has started Travel this area of the screen will display a Pause Travel button and a Finish Travel button. If they need to stop during their travel tap the Pause Travel button.

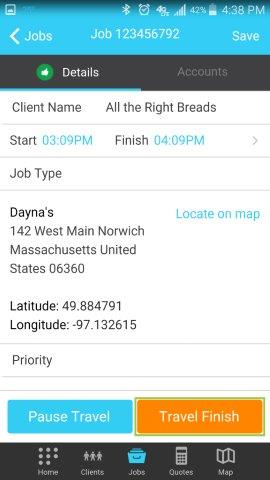
Tapping Pause Travel will place the job in Pause as indicated in the Status Icon at the top of the Details Tab. The Pause Travel button will also change to Resume Travel, which your fieldworker can tap once they start traveling again. They will also notice that the Travel Finish button is now grayed out and cannot be tapped until after they have Resumed Travel.
If your fieldworker has arrived at their destination they can tap the Travel Finish button to capture the time they arrived.
Tap Travel Finish being brought to the Stop Time screen. If your fieldworker needs to they may be able to edit the date and time on this screen.

Once your fieldworker has entered the correct time tap the Save button at the bottom of the screen.

Once your fieldworker’s Travel is finished this button will change again to say Start Job. When they are ready to start the job they can tap this to capture the time they began work on the job.
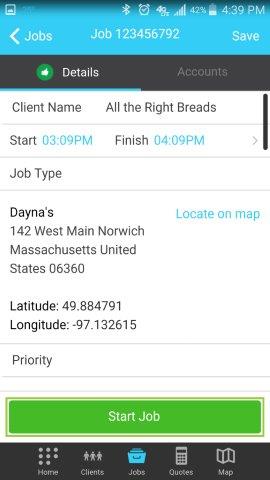
Tap this button to be brought to the Start Time screen. If allowed, your fieldworker may be able to edit the date and time on this screen.

Once your fieldworker has entered the correct time tap the Save button at the bottom of the screen.
If your fieldworker’s job has any Start Questions they will be brought to the Start Job Questions screen where they can answer each question.
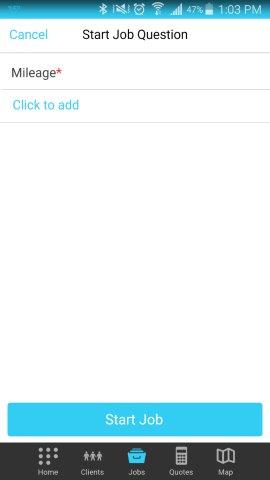
Once your fieldworker has answered all of their Start Questions tap the green Start Job button at the bottom of the screen to start the job.
After your fieldworker has started the job this button will turn into a Pause Job button and a Finish Job button. If they need to stop during their job, with the intention of continuing at a later time tap the Pause Job button. *We do not recommend that Pause is used for long periods of time. This function is meant for lunches or short breaks. If your fieldworker needs to continue the job over many days we recommend creating Sub-jobs.
Tapping Pause Job will place the job in Pause mode as indicated in the Status Icon at the top of the Details Tab. The Pause Job button will also change to Resume Job, which your fieldworker can tap once they start working again. They will also notice that the Finish Job button is now grayed out and cannot be tapped until after they have Resumed Job.

Once the job is finished Tap Finish Job.

If your fieldworker’s job has any Finish Questions they will be brought to the Finish Job Questions screen where they can answer each question.
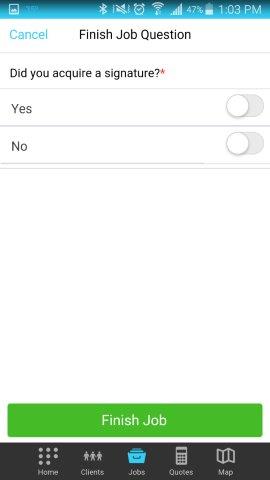
Once your fieldworker has answered all of their Start Questions tap the Finish Job button at the bottom of the screen to finish the job.
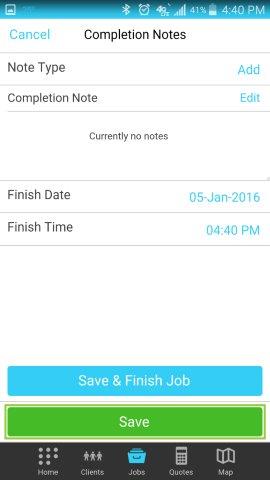
Once your fieldworker taps Finish Job they will be brought to the Completion Notes screen.
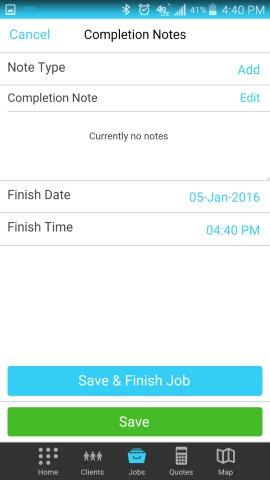
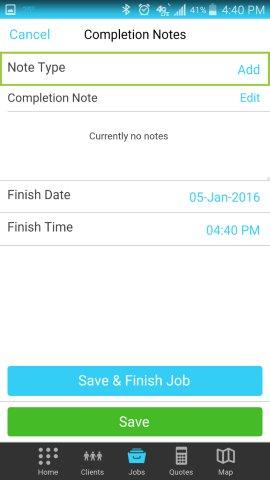
To add standard Completion Notes for this job type tap Add next to Note Type and select from the menu that comes up.
Your fieldworker can type in Completion Notes by tapping Edit next to Completion Notes.
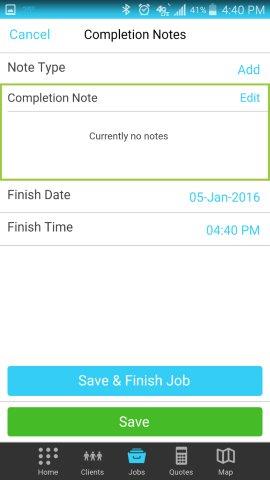
In order to add new Completion Notes tap on No Completion Notes. If there are completion notes already listed tap on the notes to bring up your fieldworker’s phone keyboard.
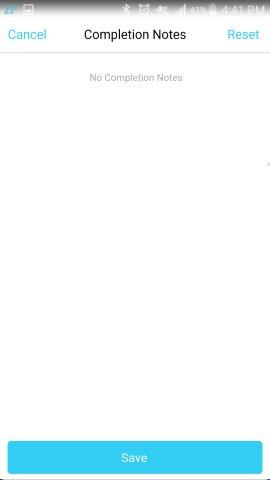
If your fieldworker needs to clear anything that they have typed into this field tap Reset in the upper right of the screen.
Your fieldworker can save their completion notes by tapping the Save button at the bottom of the screen.
If allowed your fieldworker may be able to edit the Date and Time by taping on the fields. If they are not able to this can be edited in the App Settings in the Admin Portal.
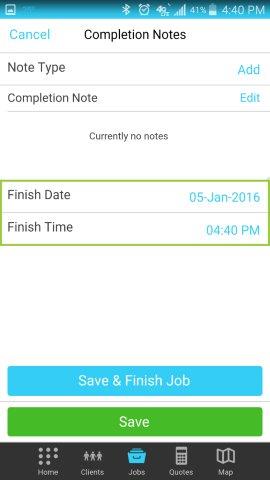
Once your fieldworker is satisfied with the Completion Notes and Finish Date / Finish Time and would like to finish the job tap the Save & Finish Job button at the bottom of the screen.

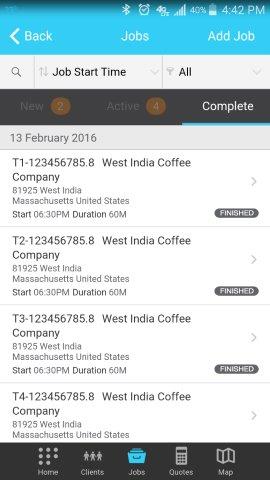
This will set the job as Finished and bring your fieldworker to the Complete tab.
If your fieldworker would still like to edit the job they can tap the on Save at the bottom to save the information.
This will bring your fieldworker back to the Details Tab in the Job.
Comments
0 comments
Article is closed for comments.